Pages

Thursday, August 25, 2016

Hey there!

I just wanted to share with you a new post on my other blog, RealWomenEat.com   It's absolutely amazingly good!  I've never made lasagna in the crock pot before, let alone use feta cheese in the recipe, but this was great!  And Mr. Man of the House said it was definitely a keeper.  So if this tempts you enough, why not head over to Real Women Eat and check it out....and you're welcome!


Friday, February 26, 2016

Freezer Cooking with Friends


Freezing with Friends is definitely a fun way to lighten the load of bulk cooking, prepping and freezing all that food.  Plus, you get to try new recipes.  Recipes that your friend's family have enjoyed (and hopefully yours will too).  

Last year, my cousin's wife, and my dear friend, mentioned she was running out of ideas for meal time.  I told her I was getting ready for another freezer session and asked if she wanted to do it together.  So began our Freezer Parties.   By the way, we also do canning parties - but that's for another day.

There are many approaches to 'Freezing with Friends' and you can tailor make it to your needs, or whims.  One method is a Freezer Swap.  For this, you don't necessarily freeze together, but it's like a cookie exchange.  You might want to keep it small, because you will prepare a meal for each person.
The method my friend and I used, though, is the one I like best.

We put on our calendar a date to get together to plan.  Each of us came up with a list of recipes our families loved.  She had never done a freezer session so she came armed with recipes they loved and we decided if they froze well and would work. Most recipes convert well to freezer cooking but there are a few ingredients that, though won't harm you if frozen, just don't hold up well.  A good rule of thumb, if you've seen it in the frozen food section (think TV dinners) than you can freeze it! And if you're just not sure, when you prepare a favorite dish, put a portion in the freezer.  Try it in a month.  Do you like it? Did it re-heat well?  Winner!   Our list was long, so we concentrated on trimming it down to a workable session and save the others for another time.  We decided on ground beef and chicken categories.  And, being the list maker that I am making a list in what order we would be doing the food according to like ingredients.  A planning day is very important.  There were some ingredients in my favorites that her family didn't care for so those where whittled off the list right away.  Had we not planned.. oh boy!

Next step was to list all our ingredients and gather total measurements from all their  ingredients list. (We're making our master shopping list) and making note of what we have in our pantry like spices, etc.  

Next, shopping!  We ended up going to Sam's Club for most of our supplies, but stopped at a grocery store to finish up.   Don't forget to get the pans you will be freezing in!  We found the party supply store had the cheapest prices at that time.  So check around.

Next, actual preparing day! Since she had a 2 year old, we do things at her house so I bring all my kitchen supplies, pots, crockpots, etc. with me early that morning.  We have breakfast and start right into it.  We had a blast and by the end of the day had a month's worth of meals to slide into the freezer.
(just one section of her kitchen with some of the dishes!)

And here's the recipe for the super-easy manicotti pictured here...

2 packages Manicotti (14 each)
1 pound ground beef
2 eggs
1 box chicken stuffing mix (like Stove Top)
2 cups cottage cheese
2 cups shredded cheddar cheese
1/4 to 1/2 cup Parmesan cheese (depending on how much you like it)
8 cups prepared spaghetti sauce

Mix stuffing mix, seasoning packet that comes with it, beef, eggs, cottage cheese, Parmesan and cheddar cheese to make a thick paste.  Set aside 5 minutes to absorb moisture.  Spread small amount of spaghetti sauce in pan.  Stuff uncooked manicotti shells and place side by side in pan.  Spoon spaghetti sauce over shells.

To bake: cover and bake 350 degrees 1 hour.

To Freeze:  Cover with foil, or Ziploc bags.  Freeze up to6 months.  To bake,thaw overnight in frige and bake according to directions.

This recipe makes two 9 x 13 pans, or three 8 x 8 pans.

So have you tried "freezing with a friend", or any other variation?  Share with us in the comments.  I'd love to hear!


Saturday, February 20, 2016

Chocolate Coma Cake


Prepare yourselves.  If  your prone to sin, I beg you, don't take one bite of this cake. This cake is chocolate on steroids.  Seriously.  Often I will do a prototype and then tweak it.  I was going for something totally decadent and I think I achieved that.  I will not be tweaking this one.   I was just going to call it a chocolate poke cake, but when I used my nephew as a guinea pig, he dubbed it "Chocolate Coma Cake".  So that's how this baby got it's name.

I'm going to share this recipe, but don't hold me responsible for contributing to your caloric demise. You've been warned.

Chocolate Coma Cake

Cake
2 cups sugar
2 cups flour
1 teaspoon baking soda
1/2 teaspoon salt
1 teaspoon vanilla
2 sticks butter
4 tablespoons cocoa powder
1 cup water
1/2 cup buttermik
2 eggs

Filing (for poking in the cake
14 oz can sweetened condensed milk
1 cup semi-sweet chocolate chips

Chocolate Whipped Cream Topping
2 cups heavy whipping cream
1/2 cup powdered sugar
1/4 cup plus 2 tablespoons cocoa powder
1/2 teaspoon vanilla extract

Optional:
mini chocolate chips
chocolate ice cream topping (the kind you squeeze)

Directions:
Cake:
Melt butter over low heat.  Add Cocoa and water and bring to a rapid boil, remove from heat.
Mix sugar, flour, soda and salt in a large bowl.  Pour heated ingredients over dry.
Add buttermilk, eggs and vanilla.  Mix well.  Pour into greased and floured 9 x 13 pan.  Bake 350 degrees for 25-35 minutes.  All ovens are different.  Mine is possessed so I watch mine like a hawk.

Once cake comes out of the oven, poke holes all over the top of the cake. 

Place sweetened condensed milk and 1 cup  chocolate chips in a microwave safe bowl.  Microwave for about 30 seconds to 1 minute.  Stir the chocolate and milk until smooth and then pour over the cake and spread to fill in the holes.  Set cake aside to cool (you can hasten the cooling by sticking in the frige - which is what I did)

To make the whipped topping, whip heavy cream until it begins to thicken.  Add powdered sugar, cocoa and vanilla extract and continue to whip until stiff peaks form.  Spread whipped topping on top of completely cooled cake.

Here's where you can get creative and chocolate it up ever further by sprinkling mini chocolate chips on top, and then drizzle the chocolate ice cream syrup on top of all that!

You'll want to keep in the refrigerator until ready to serve because of the whipped topping.    

So there you go.  See what  I mean?  (devilish giggle)


I am participating in Meal Plan Monday


Friday, February 12, 2016

Freezer Foods Friday is back

I hope your as excited as I am that Freezer Foods Friday is making a comeback. It's been a while and I've missed it.    Here's a little , er... educational introduction... to kick us off.

This might be "old news" to you, a refresher, or a new slant. However you receive it, I hope there is something you can use or add to. 


There are many types of "freezer cooking" methods. There's the OAMC (Once a Month Cooking); TAMC (Twice a Month Cooking); Mini Sessions, preparing meals by categories...The methods and lists are as vast and varied as individual's tastes.

Whatever "style" you adopt, the most important rule is organize your recipes!

You can have a card-file system or notebook file system. I use the notebook pages because I can have each recipe printed on an individual page, put in a page protector and place in a three ring binder. You can see my post about organizing my recipes into notebooks by clicking here:  Organizing My Recipes from Magazines, etc.

Before cooking day, study each recipe to decide on the order in which you'll prepare them. It may sound like overkill, but it really helps the process run more smoothly. Once you've decided, put the pages in order in which you will prepare them. The page protectors are great because I almost always spash! All I have to do is wipe these clean.

Menu - You might like to fly by the seat of your pants, but you really need to do a menu. You don't really want a month of all Mexican, or Italian food do you? There are all sorts of sites with good forms to print out for menus and I've used a lot, but in a pinch, I like the old, take a sheet of notebook paper, fold it in half, fold it again, and again. Unfold and you've got 8 blocks. Yeah, I know there aren't "usually" 8 days in the week, contrary to what the Beetles said! (I'm showing my age aren't I). Just fill in the 7 blocks with a day's menu.  Super simple, right? 
Try only a few new recipes each month. (That way if it flops, it was only one meal) Your menu should be mostly ones your family already likes.

If you're not sure a family favorite will freeze well, when you prepare the dish, take out a portion and freeze it. "Test" it in a week or two to see if it passes the test. If so, great! You've got another freezer-food to add to your list. And, well, if it doesn't, you haven't wasted time and money.

And I can't stress this enough... Label your foods!  In a month or so, you won't be able to tell the difference between chicken broth and squeezed lemon juice (for lemonade) by just looking at that freezer bag.  Trust my experience, here.

I like to buy steaks and chicken when they're on sale.  My husband is the designated "griller" in the family and he's a steak kinda guy.  I don't make my marinade for the beef, but I buy a marinade called "allegro".  I really like the flavor of this.  So, what I do, is when our local grocer has steaks buy one get one free (I love those deals!) I buy what they will allow, bring them home and place in a zippered type freezer bag, pour the marinade into the bags and freeze.   When we're ready for grilling, I take them out to thaw in the frige and while they're thawing, they're marinating.  Win Win!

Ok, I can't leave chicken out, can I? Here's a couple of great freeze-in-the-bag-with-chicken marinades.  If you will notice one recipe I used as a marinade is from the recipe that everybody was making a while back...You know, the Apricot Chicken recipe? Well did you know it makes a great marinade for grilling chicken? It does!


Honey Chicken Marinade
3 TBSP soy sauce
1 TBSP honey
1 TBSP olive oil
1 tsp lime juice
1 tsp garlic

Apricot Chicken Marinade
1/2 bottle Catalina dressing
1/2 packet of dry onion soup mix
3 TBSP olive oil
12 oz jar of apricot preserves - heated in the microwave until runny.

Alright, if I haven't bored you to tears yet, I want to leave you with one more recipe. Would that be ok?
I've had this for probably 18 years or so, and I've made them into little (portion controlled) muffins, with a crust, without and called it a casserole, you name it.  But it was originally called Crustless Quiche.  It's great to fix ahead and have for holiday breakfasts or brunch.

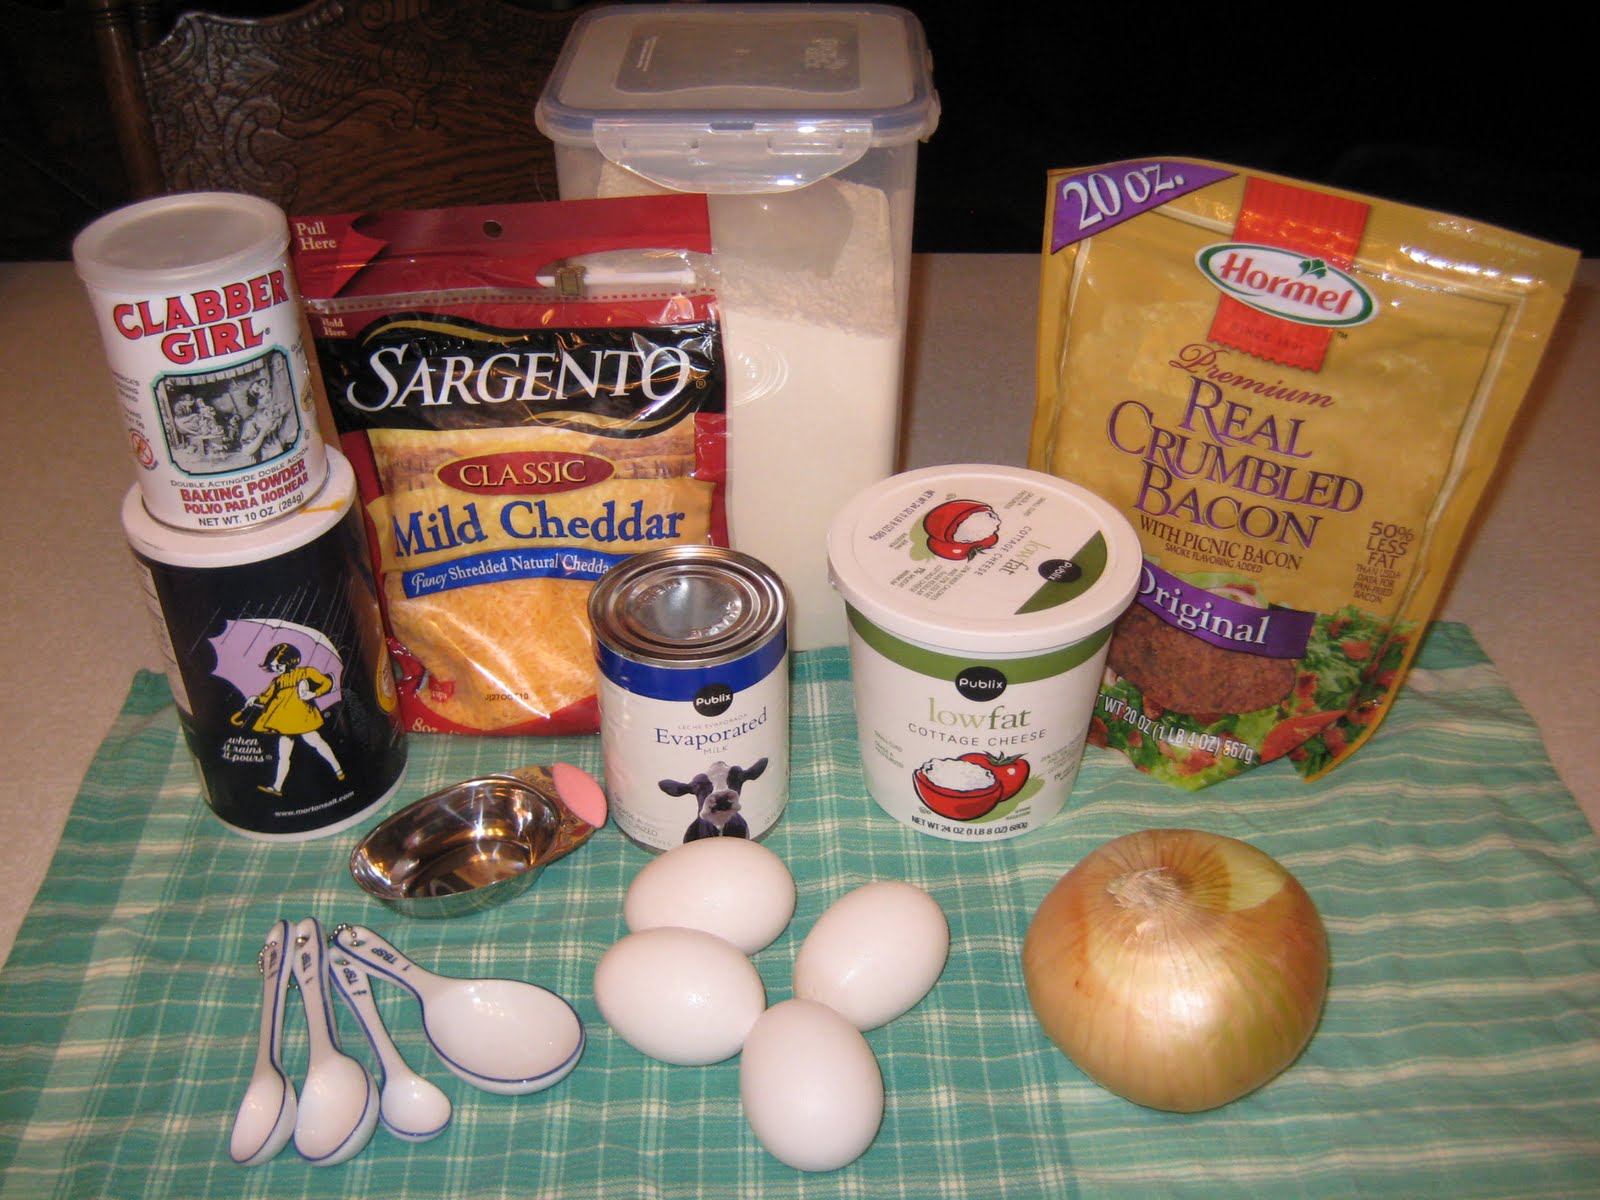
You're going to need...
16 ounce container cottage cheese
4 eggs
1/4 cup milk (you'll notice I used evaporated milk, you can use regular "jug" milk but this makes it richer)
1/4 cup flour
1 teaspoon baking powder
1/4 tsp salt
2 cups cheddar cheese, shredded (I used mild but you could use sharp too)
cooked and crumbled bacon (equal 10 slices) I cheated, see pic?!
1/4 cup chopped onions

Process cottage cheese in a food processor or blender until smooth.  (I use a blender)


transfer to a large bowl
In a medium bowl beat eggs.
Add milk, flour, baking powder and salt to eggs and mix until smooth.
Add egg mixture to cottage cheese and mix.
Stir in shredded cheese, bacon and onions.

Now here's where you choose... Do you want to bake and freeze, or just freeze?

If you want to bake 'em now and freeze, then pour into muffin tins (mini or regular - doesn't matter)
bake at 375 degrees for 12-15 minutes or until edges are lightly browned.

Cool and freeze in freezer bags.

I chose to pour the mixture into freezer bags to bake later. When I'm ready to bake 'em, I'll just thaw in frige and follow the above instructions.

I hope this has helped inspire you to either begin, start back up, or step up your freezer game a bit. Don't forget to check back next Friday for another tried-n-true freezer meal and I will share with you about Freezer Meals parties, and making freezer meals with a friend.    Until then,

Be Sweet!


LinkWithin

Related Posts with Thumbnails